Step 1
Choose a color scheme. You'll only need four colors, which have an equidistant range of values. That is, a highlight, a shadow, and two shades in between. The Color Guide panel can be useful when choosing colors. Click the pull-down menu to reveal various sets, all based on color theory. Or just use the values below. Once you have the four colors, click New Color Group at the bottom of the Swatches panel to store your swatches in a neat group.Note: For the rest of this tutorial, I will refer to the colors numerically, with the lightest being 1, and the darkest, 4.


Step 2
Start at the top left of the artboard and draw a triangle, using the Pen tool (P). It can extend beyond the left and top artboard edges (we'll clean it up later). Fill the triangle with color 2. Now draw an ellipse with the Ellipse tool (L), positioned at the left edge of the triangle.
Step 3
Select both objects and go to Object > Blend > Make. Your blend should look like the image below. If it looks choppy, undo, then double-click the Blend tool. Choose Smooth Color as the spacing method and try again.
Step 4
Draw a thin rectangular shape that aligns with the bottom of the blend. Fill it with color 2. Then draw a smaller shape inside this one and fill it with color 1. As before, make a blend. If necessary, adjust individual points of the blend objects using the Direct Selection tool (A), so it looks like a cylinder, with a highlight on top. The blend will update as you move the points.Carefully position this second blend alongside the first one so that no white shows through. Again, you may have to adjust individual anchor points.

Step 5
Make another blend, this time with a larger, curved quasi-triangle as the base, and an amorphous ellipse for the highlight. You can draw the highlight shape with the Pencil tool (N). Hold down the Option (PC: Alt.) key at the end of the stroke to close the path.
Step 6
At this point, it may be hard to visualize the end result, because of the ragged edges. You'll use a Clipping Mask in the last step to tidy it up, but for now, you can make a temporary frame around the artboard to hide them. First draw a square the size of your artboard. Then go to Object > Path > Offset Path. Enter a value large enough to cover the rough edges and click OK. Now select both squares and go to Object > Compound Path > Make. Fill with white, and put this frame on a new layer above the blends layer. Lock the frame layer. Now you can continue working on the bottom layer, without seeing the edges.

Step 7
Draw a large shape whose top edge closely matches the bottom of the previous blend, and then extends about two-thirds down the artboard. Fill it with color 3. Offset the path by about -20 pixels, and fill the new path with color 2. Now draw a free-form shape with the Pencil tool as in the image below. Fill it with color 1. Select all three shapes and blend them. Send this object behind everything else, and adjust if necessary, so that there are no gaps.

Step 8
To add depth and realism to the image, you can create more blends and place them on top of other blends. For example, make a three-step blend from some freehand ellipses. Carefully place it (and subsequent blends) on top of the large blend from Step 6. Make sure that no area of color overlaps an area of different color. In this example, the small blend is situated on top of a large swath of color 1. Since the small blend's bottom color is color 1, the result is a smooth transition. Sharp edges are undesirable.


Step 9
Continue making blends until you reach the bottom of the artboard. Vary their size to add interest. For added depth, I created a corner fold which consists of one blend stacked on top of another. To achieve the highlight on the edge of the fold pay careful attention to how the two shapes interact. Adjust individual points with the Direct Selection tool (A). You can also use the Group Selection tool (white arrow with + sign) to select and move individual objects within a blend.
Step 10
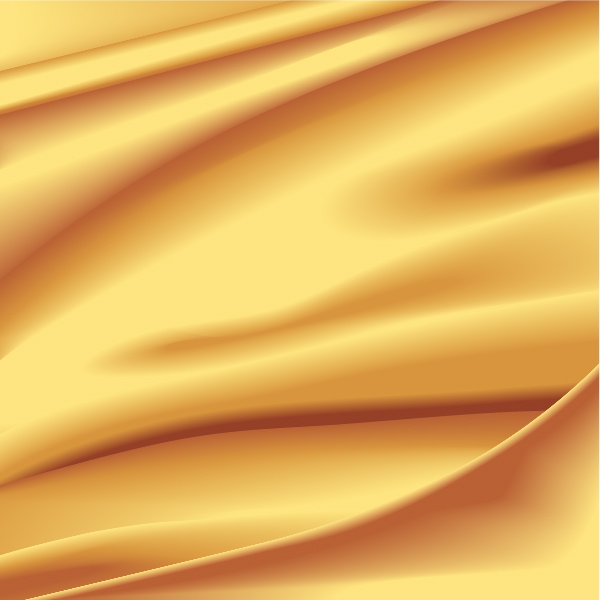
After all the blends are in place to your satisfaction, you may leave the white frame in place, or create a clipping mask. To do the latter, draw a rectangle over the area you want to show, then select both the blends and rectangle and go to Object > Clipping Mask > Make. Your final image should look something like the image below.Conclusion
With Illustrator, there is always more than one way to achieve a desired look. Each way has its advantages, but often it's a matter of what you're used to and comfortable with. Some people might find Blends easier and more flexible than Gradient Mesh. Once you perfect your blend-making technique, you'll find that the blends are the easy part. The success of the final result lies in the careful positioning of each blend, and the relationship between each. Once you've mastered this technique you can create a variety of flowing fabric backgrounds.Final Image Preview

Taking inspiration from Andrew Footit and his LightSpeed poster.
Start working by creating a new document (Ctrl+N) in Adobe Photoshop CS5 with the size 1280px by 1024px (RGB color mode) at a resolution of 72 pixels/inch. Use the Paint Bucket Tool (G) to fill with #23123F color the new background layer.

Take now the Ellipse Tool (U) and drag to draw a small ellipse on the top of the canvas.


Set Fill to 0% for this layer and click on Add a layer style icon from bottom part of the Layers panel and select Outer Glow.

Add Gradient Overlay.

Click in the color bar to open the Gradient Editor and set the color stops as shown. Click OK to close the Gradient Editor dialog box.

We’ve got the next effect on the ellipse:

Make now many copies of the drawn ellipse (Duplicate layer) and choose the Free Transform (Ctrl+T) command to change the copies’ sizes and their position on the canvas.

Make a copy of one layer with the ellipse on it, select Free Transform (Ctrl+T) command and change the copy’s size and its position on the canvas as shown.

Create a new layer above the last made one, select both layer and press CTRL+E to Merge Down. On the rasterized layer we’ll apply the next filter: Filter>Blur>Gaussian blur.

We’ve got the next result:

Make one more copy of the ellipse’s layer and choose Free Transform (Ctrl+T) command to enlarge the copy’s layer and place it as it is shown below.

We need to rasterize the layer with the circle the same way described above (Create a new layer above the last made one, select both layer and press CTRL+E to Merge Down). Apply on the rasterized layer the next next filter: Filter>Blur>Gaussian blur.

We’ve got the next result:

Combine in a group all the layers composing the ellipses (press CTRL button and select the necessary layers on the Layers panel. Then hold on the left mouse’s button while draging the selected layers on Create a new group icon from bottom part of the Layers panel.
Use again the Ellipse Tool (U) to draw a small ellipse under the made group already.

Set Fill to 0% for this layer and click on Add a layer style icon from bottom part of the Layers panel and select Gradient Overlay.

Click in the color bar to open the Gradient Editor and set the color stops as shown. Click OK to close the Gradient Editor dialog box.

We’ve got the next result:

Make many copies of the last made layer containing the ellipse and choose Free Transform (Ctrl+T) command to change the copies’ sizes and their placement as shown.

Combine again in a group all the layers containing the last made ellipses (press CTRL button to select the necessary layers and hold on the left mouse’s button when draging the selected layers on Create a new group icon from bottom part of the Layers panel).
We have to draw now the next ellipse between the groups, using the Ellipse Tool (U).


Set Fill to 0% for this layer and click on Add a layer style icon from bottom part of the Layers panel and select Gradient Overlay.

Click in the color bar to open the Gradient Editor and set the color stops as shown. Click OK to close the Gradient Editor dialog box.

We’ve got the next result:

Make many copies of the last made ellipse’s layer and choose Free Transform (Ctrl+T) command to change the copies’ sizes and their placement, placing them as it is indicated below:

Let’s represent now the next ellipse, placing its layer above all the previous ones, using the same Ellipse Tool (U).

Set Fill to 0% for this layer and click on Add a layer style icon from bottom part of the Layers panel and select Gradient Overlay.

Click in the color bar to open the Gradient Editor and set the color stops as shown. Click OK to close the Gradient Editor dialog box.

We’ve got the next result:

- See more at: http://www.adobetutorialz.com/articles/30970556/1/create-abstract-colorful-balls-illustration-in-photoshop-cs5#sthash.qf2FyY3i.dpuf
Komentar
Posting Komentar